Author: BrandenZ
of ZCar.com
Date: May 2, 8:57am
This tech article is meant to help facilitate the installation of a 94-97
Honda Accord Wiper Motor in a 70-78 Z. The installation procedure below was
used on a 73 240z. Though I know of an install on a 78 280z, I cannot
guarantee any similarity in the wiring. This is for informative purposes only
and I take NO liability for anyone attempting to install the wiper motor into
their Z or any other vehicle.
I want to issue a tremendous "THANKS!" to Ed from HybridZ. As far as I'm
aware, this was entirely his idea and he was the first to successfully
integrate the Honda motor in the Z. I would never have attempted this without
the information he provided to me both on and off-forum.
Warning: Though the wiper motor works on ALL speeds, including intermittant
and the washer-fluid button, my wiring does not allow the wiper to return to
the stop/set position after being turned off at the stalk. I am confident that
one of the two unused wires from the Z harness may be able to allow this
function to be operational, but currently I am content with just timing
switching it off with the wipers being at the bottom of the windshield. If you
expect it to be perfect, this is NOT for you. Hopefully someone on the forums
will figure out (or help me figure out) a way to improve upon my wiring
"guesswork" to allow for full functionality. I am just happy to have wiper
performance improved ten-fold. Whereas the stock motor on high would take over
3 seconds to fully swipe, the Honda motor on high completes a full swipe in
under a second.
Removal:
First, lift up the wiper blades and remove them by removing a single 14mm nut
on each wiper. Also remove the 4 flathead-screws that fasten the
top-grill/scaffolding to the car.
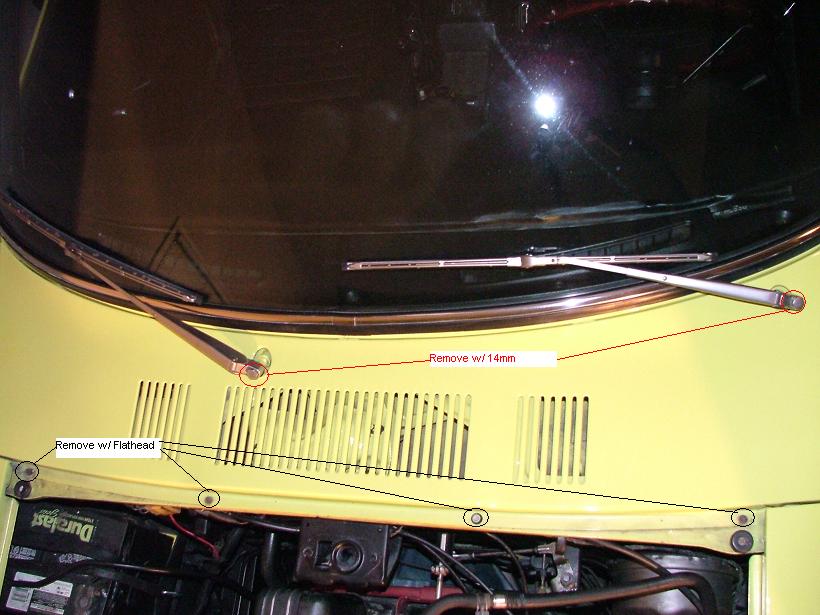
Next, remove the 4 10mm bolts that hold the wiper motor bracket to the frame.
2 of the bolts are hidden towards the front of the firewall and wiper-motor.
You'll have to pull the vinyl cover out of the way a little to see them and
you'll need a long extension (or 2 short ones!) to get after it.
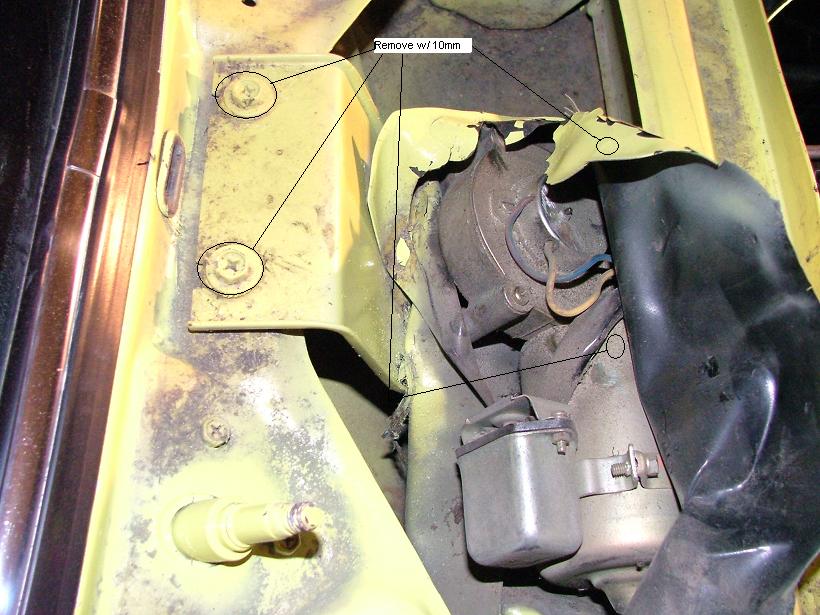
Now pull the bracket back to expose the 12mm nut holding the wiper motor to
the mechanism. Remove this nut with a wrench.

The wiper motor will now be completely free of the mechanism. All that is
required now is for you to disconnect the wiper motor harness from the Z
harness. Once this is removed and pulled through the firewall, the bracket +
motor + wiring will be free for you to remove it from the car.

The motor is free! Here are a few comparison shots of my 97 Honda Accord wiper
motor and my stock 73 240Z wiper motor. FYI, both a 94 and a 97 Accord motor
have been successfully used on installs, but I used a 96-00 Honda Civic wiring
diagram which matched _exactly_ to the Accord motor. Again, I offer no
guarantees, but I believe the 96-00 Honda Civic motor will also be a match.

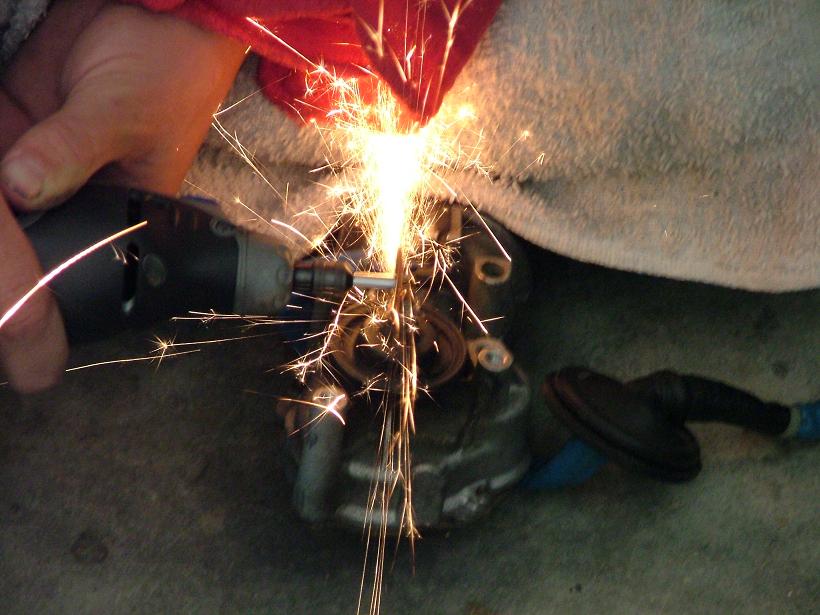
The next comparison picture shows the difference between the threads from the
Z motor and how it mounts to the mechanism vs the threads from the Honda
motor. Modification MUST take place here to mount the motor to the Z
mechanism. Ed had success taking ~1 hr to file down the Z mechanism to accept
the larger Honda threads + the tapering at the end. This requires removing the
mechanism from the car as well (not pictured in this article), you can do so
by removing 6 8mm bolts, 3 per wiper mount. I simply blasted on it with a
Dremel for 5 minutes to square off the Honda motor threads.

Now we'll go to the actual modifications required to bolt the Honda motor back
to the car:
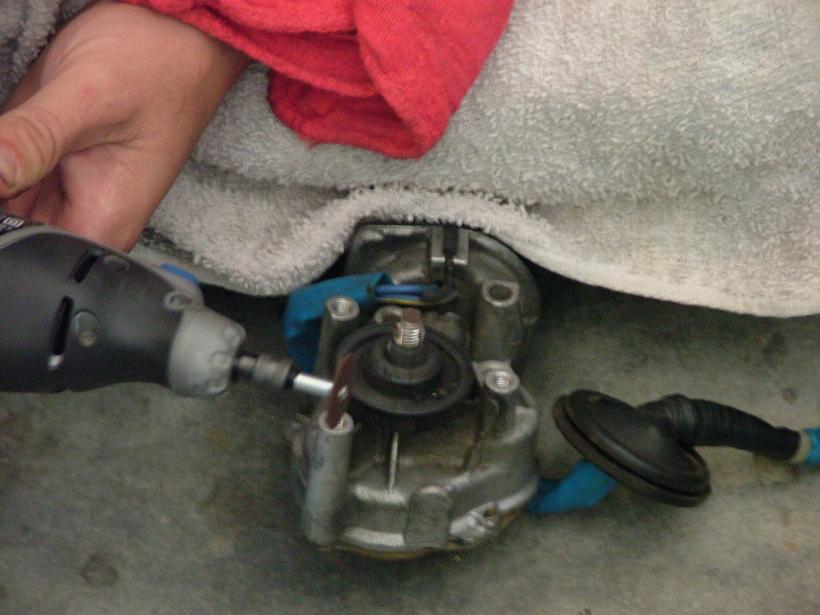
Dremeling down the threads where the Honda motor will mount to the Z
mechanism!
Finished product, notice how the threads are now squared off:
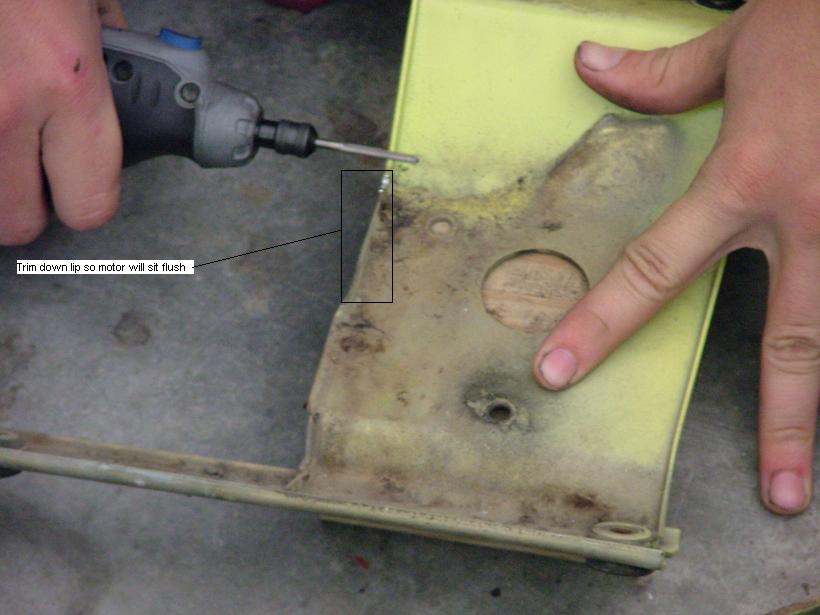
Now the bracket must be modified. Remove the Z motor from the bracket by
unscrewing the 3 phillips-head screws. The lip on the bracket must be trimmed
away for the Honda motor to sit flush. Also a small portion of it must be cut
out. Lastly, 3 holes must be drilled to accept the tighter bolt pattern of the
Honda motor.
Lip modification, post cutting:
Complete finished product with modified Honda motor bolted to modified Z
bracket. Note that the screws that fastened the Z motor to the bracket thread
perfectly in the Honda motor holes, so I reused them.

Now all that's left to do is bolt the modified bracket + Honda motor to the Z
mechanism. You will need to source your own bolt to match the Honda threads. I
believe it was an M10x1.25 but I don't remember. I received the Honda
mechanism with the motor ($20 + shipping from Ebay!), so I reused the bolt
that came with the motor. Also, the bolt is very large and barely sit flush
with the Honda threads modified to a rectangular cut (the Z mechanism mount is
pretty thick). I used red loctite on the nut and torqued it down to over
40ft/lbs to be safe.
100% Optional: Now would be a good time to remove your stock mechanism and
clean it up. It only requires 6 8mm bolts to come out. I cleaned mine up,
hosed it down with break cleaner, wd40, and then lubed all of the joints with
axle-grease. Having it removed from the car also made it easier to fasten the
Honda motor to the mechanism and really torque the nut down good. The
mechanism, bracket, and motor will all go back in the car bolted together, it
just takes some doing.
Lastly, you've got to wire the sucker up. My stock Z harness was 6 prong,
while the Honda motor harness is 5 prong. In order to make for a clean
install, I clipped the 5 prong connector off of the Honda motor, then clipped
the 6 prong connector off of the Z motor. I soldered together the necessary
wires from the Honda motor to the Z motor harness, then simply ran the Z motor
harness through the firewall and clipped it back in to the Z harness at the
firewall. Looks completely stock.
I only connected 4 of the Honda motor wires, leaving 1 unused on the Honda
harness and 2 unused on the Z harness:

Again, this wiring was done on a 73 240z. I cannot promise the wiring will be
the same for any other models.
I would love to hear information from anyone who knows the Z wiper wiring so
as to potentially improve upon the function of the wiring. I did mine by using
a multimeter to guess-and-check, and using the Honda motor wiring diagram. The
honda wiring, as I understand, is as follows:
5 prong harness:
-1- -2- -3-
-4- -5-
1: Low speed, either blue or blue/yellow. don't remember, will update
2: High speed, either blue or blue/yellow.
3: Ground, black.
4: 12v constant, green/black.
5: Intermittant, runs to control module/relay, blue/white.
The Z harness, as I wired it, which I don't fully understand:
6 prong harness:
-1- -2- -3-
-4- -5- -6-
1: 12v, blue/red.
2: Ground, black.
3: No idea, maybe allows for proper stop/set of wipers
4: No idea, maybe allows for stop/set, seemed to read fluctuating voltage when
engaged.
5: High speed, either blue or blue/yellow. don't remember, will update
6: Low, intermittant, and washer. Probably relay driven. Blue or blue/yellow.
As seen by the above picture, my wiring connects:
Honda to Z
1 to 6
2 to 5
3 to 2
4 to 1
Again, I would love input from fellow Z experts in regards to the unused
wiring.
With the wiring complete, bolt the mechanism back and bolt the bracket back.
Now test it out with the key turned to power accessory mode before mounting
the wipers on. Low speed should work but will take a long time for the relay
to kick, you should see minor movement at the wiper mounts. I only get 1/2
swipe per relay kick, so low is basically useless. Intermittant should be a
slow, but constant swiper and show continuous movement at the wiper mounts.
High should see rapid and constant movement at the wiper mounts. The washer
fluid spray button should kick off ~2.5 swipes. Wiper tends to get stuck at
random places on the windshield at the end of the fluid-spray-relay acutation.
Once everything appears to be in order, try to watch the wiper mounts for
movement and stop the wiper motion right at the bottom of one of the movements
right when the mechanism is about to switch directions. Now bolt 1 of the
wipers to 1 of the mounts, enable the intermittant speed to check that the
motion of the wiper is correct. You may have to unbolt the wiper and rebolt it
in different locations several times to get the travel correct. Once the
travel is correct, bolt the grill/baffling back up and both wipers back up!
Enjoy!